
One of the features that many web applications require is Authentication. Every time that you tell yourself “Only some people can use this feature” you definitely end up with Authentication, Login page, etc.
There are two general approaches when it comes to having authenticated users for an application:
- Implement your in-house authentication
- Use a third-party authentication service
Many small projects and startups prefer the second approach (so-called Seamless). The reason is obvious: Implementing, testing, securing, and in general taking care of authentication data and processes takes time and resources and is also risky. So the alternative is benefiting from an already existing and well-known authentication service:
- You can focus on your application without worrying about authentication
- More safety since these authentication services are well-tested in most cases.
- Last but not least, your users can enjoy Seamless where they do not have to create an account for your app and can re-use their old account on Google for instance.
So Reusability is the key to heaven!
In this post, we will implement this authentication approach. Our authentication service is Github.
We will use React as our Frontend and Flask/Python as the backend service. In my previous posts, I explained how to initiate a Flask app and also some Hints about React application development for Frontend.
Since we are using the Flask app from the previous posts, I suggest taking a look: https://www.polaz.net/dockerizing-flask-app-with-postgres-a-step-by-step-guide/
What is the flow?
The general flow for authentication with GitHub is like:
- When a user clicks on the login button, your frontend React app sends a login request to GitHub
- GitHub shows the authentication page to your user
- If the user approves, the GitHub returns a login code to your Frontend.
- Then Frontend sends this code to your backend.
- The backend then exchanges this code with an actual access_token from GitHub
After this, your user is authenticated.
Note: Although is technically possible to only use a frontend application for authentication with a service, in a real setup you definitely need a backend service since we cannot share our authentication app secret (used for code/access_token exchange) with the rest of the world! (look at the next chapter)
First Step: Create an authentication App on GitHub
Before we jump into the code, we need to create an authentication app on GitHub.
On your GitHub, navigate to Settings -> Developer Settings -> OAuth Apps
Then click on the New OAuth App button.
You will see a form that you need to fill in.
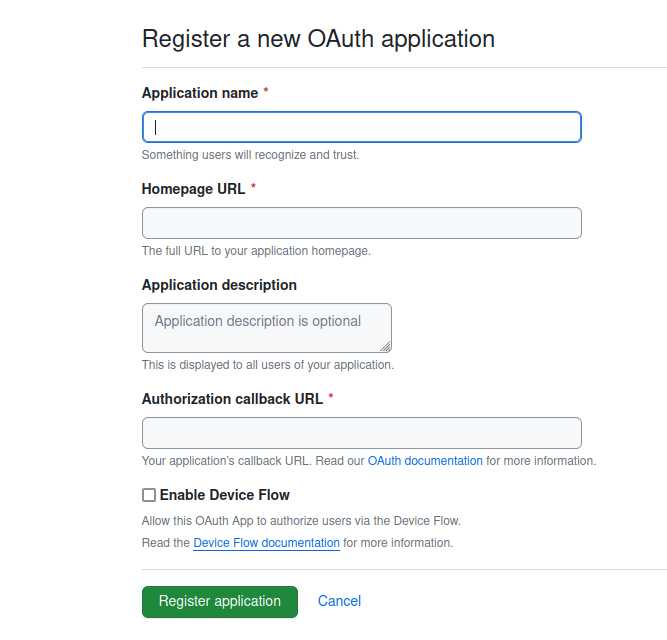
Fields are:
- The first three fields are not related to the implementation later. But these are very important since users want to make sure they are sharing their GitHub user data with somebody trusted. This information gets shown to the user when GitHub asks for their permission when they want to log in to your app. So put meaningful data here!
- The last field (callback URL) is used later in the code. Here you basically tell GitHub where to go after finishing the authentication. This will be our frontend React application. So we put this: “http://localhost:3000/login” (this will be our React app homepage URL).
After clicking the Register Application button, you will see that your app has been created. Two things are important to copy and use later:
- Client ID
- Client secrets: This one you need to generate by clicking Generate a new client secret
Now that our app is ready, let’s start the implementation!
Backend: Flask
Here we implement a new module with a login function to handle the code/access_token exchange.
Note: We use the dockerized Flask app from the previous post. Take a look if you are not familiar with it. https://www.polaz.net/dockerizing-flask-app-with-postgres-a-step-by-step-guide/
Our new module name is user and the function name is login:
from flask import Blueprint, request, jsonify
import requests

blueprint = Blueprint('user', __name__, url_prefix='/user')

@blueprint.route("/login", methods=["GET"])
def login():
    github_code = request.args.get('code')

    auth_data={
            "code": github_code,
            "client_id":"YOUR_AUTH_APP_CLIENT_ID",
            "client_secret":"YOUR_AUTH_APP_CLIENT_SECRET",
            "redirect_uri": "http://localhost:3000/login"
        }
    resp = requests.post("https://github.com/login/oauth/access_token", data=auth_data)
    if resp.status_code == 200 and "access_token=" in resp.text:
        token = resp.text.split("access_token=")[1]
        token = token.split("&")[0]
        user = requests.get("https://api.github.com/user", headers={"Authorization": "token " + token})
        if user.status_code == 200:
            user_data = user.json()
            response_data = {}
            response_data["github_token"] = token
            response_data["username"] = user_data.get('login')
            response = jsonify({'_result': response_data})
return response- First, we get the code from the client (frontend)
- Then we create the payload that we need to provide for exchange. Besides the code, we also provide the client ID, secret, and the redirection URL. These are the ones we obtained and set in our GitHub OAuth app in the previous step.
- Then we send the post request to exchange
- If it returns 200 and access_token exists in the response text, our authentication is successful. After this, we use the split function to catch the access_token value (based on the GitHub response format)
- !Attention! The rest of the code is not part of the authentication process and is not necessary to do. It is just an example of how we can get the user data from GitHub with the access_token that we received. Also, you can return whatever suits your case to the Frontend.
Now we can continue with our React App!
Frontend: React
The Frontend supposed to do three things:
- Render the Login button
- Get the code from GitHub
- Send exchange request to the Backend to finish the authentication process
Below you can see the component that does the above steps. Note that the only thing important is the above flow. The rest of the code such as using the class component and the way we process the GitHub code are my choices for this post and it is up to you how to implement them.
import React from "react";


class Login extends React.Component{
    constructor(props){
        super(props);
        this.getCodeFromGithub = this.getCodeFromGithub.bind(this);
    }

    getCodeFromGithub(e){
        let codeUrl = "https://github.com/login/oauth/authorize?scope=user,repo";
        codeUrl += "&client_id=YOUR_AUTH_APP_CLIENT_ID";
        codeUrl += "&redirect_uri=http://localhost:3000/login";
        window.location.replace(codeUrl);
    }


    componentDidMount(){
        let cUrl = window.location.href;
        if(cUrl.includes("code=")){
            let code = cUrl.split("code=")[1];
            fetch('http://localhost:8008/user/login?code=' + code)
                .then((resp) => resp.json())
                .then((resp) => {
                    if(resp["_result"]){
                        localStorage.setItem("github_token", resp['_result']["github_token"]);
                        window.location.replace("http://localhost:3000/login");
                        return true;
                    }
                })
                .catch((e) => {
                    // handle when something goes wrong with your authentication
                })
        }
    }

    render(){
        return [
            <div className="row">
                <div className="col-sm-12 text-center">
                    <div className="row justify-content-center">
                        <a onClick={(e) => {this.getCodeFromGithub(e)}}  className="btn btn-primary">
                            Sign in with GitHub
                        </a>
                    </div>
                </div>
            </div>
        ];
    }
}

export default Login;- The component renders a login button. The button is bound to an event that sends a request to GitHub to obtain the authentication code.
- The function to get code is named getCodeFromGithub
- In this function, we utilize our client ID (Github OAuth app) and redirection URL. The endpoint to obtaining code requires setting the scope that is “user,repo” in this case. This means the access_token is authorized to get user data and modify repositories on GitHub. This depends on your application needs.
- The last function is the componentDidMount. This function runs after rendering a component for the first time in React. In this function, we get the code (returned by Github) from the URL and then send the exchange call to our backend.
The reason for using componentDidMount is that GitHub redirects to the callback URL we provided earlier alongside the authentication code like “http://localhost:3000/login?code=1233….
So the Idea is since our login button gets rendered after the redirection, we can utilize it to capture the authentication code.
Finally, we store the user access_token in the browser’s local storage and redirect to the application homepage.
Note: You need to add this component to the application route rules in App.js of this React application:
https://github.com/Pooya-Oladazimi/blog-post-app/blob/main/src/App.js#L19
Our authentication is now ready to use!
The Flask app source code: https://github.com/Pooya-Oladazimi/flask-cool-app/tree/master
The React app source code: https://github.com/Pooya-Oladazimi/blog-post-app/blob/main/src/components/Login.jsx
The End.